Did you know that Google has a directory of fonts found at the
Google Font Directory?
I DIDN'T KNOW THIS EITHER!!!!!!!!
This is very exciting news for those of us who want to make our blogs a bit different, especially when it comes to using non-boring fonts.
Georgia and Verdana, I love you guys but sometimes you bore me to tears! I knew there was a way to convert a font to a flash file and then use that, but that was a massive pain in the bum!
Anyway, here's my tutorial on how to use any of these fonts in your blog! Easily! Just two lines of text in the code need changing!
A list of fonts we can pick from can be found
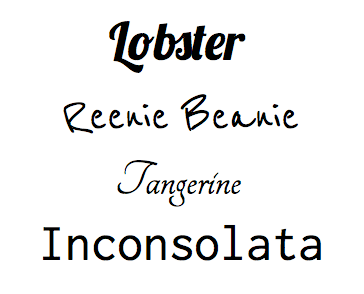
here. Take a look at some of these babies:
A few things before we start:
- You should be somewhat comfortable about editing html. You don't have to be a professional but you need to be somewhat savy and not scared of html.
- There are only a limited number of fonts. Sorry but you can't use that font you saw that time. You can only use the ones Google have to pick from. Don't worry, there are some nice ones and fingers crossed more will be added soon.
- I DO NOT recommend using the font for your whole blog (c'mon, we don't want to make people's eyes bleed!) but I'll show you how to use it in the post title header of your blog posts. Infact I have been using Lobster font in the title post of this blog for a week or so now. Yes, click out of your reader and come and have a look.
I would suggest using these fonts for the blog post title, the blog title or the sidebar header title.
Sharnee's very exciting tutorial on how to add fancy fonts to your blog post:
1) Click on the DESIGN and the then EDIT HTML tabs in Blogger
2) Download a copy of your current template & save it somewhere safe (naturally this is recommended any time you're making changes to your blog in case things go CRAZY).
Please be aware that for this tutorial I am using the generic Watermark blogger template but it should be pretty similar no matter which template you're altering.
3) Visit the Google Font Directory and pick which font you want to use:
the site is here.
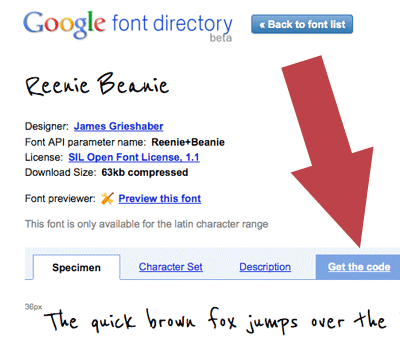
Once you have picked a font you want to use, click on it. I'm selecting "Reenie Beanie" as a test.
Click on "get the code"
Now you'll see two boxes of code.
Copy the top box of code.
In the case of Reenie Beanie, that code looks like this:
<link href='http://fonts.googleapis.com/css?family=Reenie+Beanie&subset=latin' rel='stylesheet' type='text/css'>
Now, unfortunately when I try to use this code, exactly as Google have provided, I get an error. Don't worry, I'll explain how to fix it.
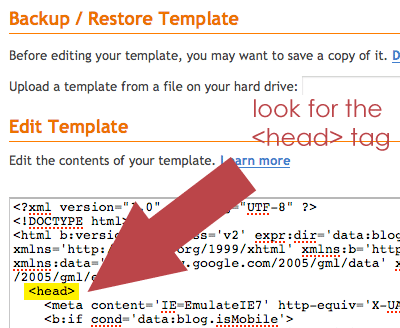
4) Return to Blogger and look to the box box of code. What we are looking for is the <head> tag
Paste the code directly below this (yes, you can hit return and put it on a new line)
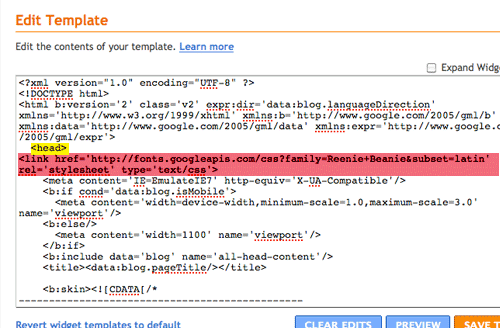
So now, this is how it looks for me:
(the pink being the code I just added)
Now here's the important parts to make it work:
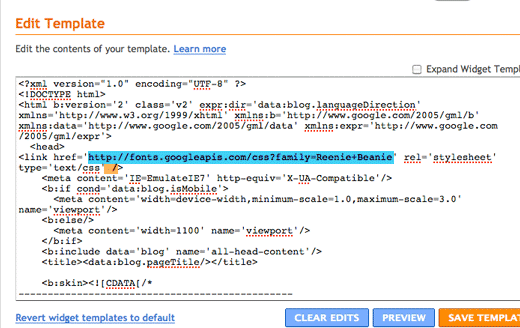
- put a space and then a '/' at the very end, just before the last pointy > bracket!
- erase the &subset=latin bit
Now my code looks like this:
NOTE: there is a plus "+" sign between the words Reenie and Beanie. If you have chosen another font with a single word name, then it will just be the one word and no plus sign.
5) This tutorial shows you how to change the font used for the blog post title. Therefore we have to scroll down the code until we find the following:
h3.post-title {
font: $(post.title.font);
margin: 0;
}
Let's delete that font: $(post.title.font); line and replace with this:
font: 28px 'Reenie Beanie', arial, serif;
So that code now looks like this:
h3.post-title {
font: 28px 'Reenie Beanie', arial, serif;
margin: 0;
}
OK!
NOTE: You will be able to play around with the font size, as the above is using 28px as the size. Make it smaller, make it bigger. Try some different sizes. 28px is a bit small for me so I'm going to make it 36px.
(also, in case you were wondering, the "arial & serif" fonts are listed there for backup in case the computer can't read the fancy font, it will revert to a safe one)
Click PREVIEW
If it looks good then SAVE!
HOORAY YOU DID IT!
Now, I did this example on the Watermark template (using Bloggers fancy new template designer). If you are using one of my delightful templates - or another customised one - the title code you're looking for may be called something else. In my templates they are often called:
.post h3 {
Usually under /* ---( main column )--- */
Sometimes, the font size and the font type may be on different lines. You may have to delete both of these single lines to make it work.
Anyway, if you have any problems, leave a comment and let me know.
Remember, if everything gets screwed up then you did save your template for backup! Didn't you?
PS: I tried to write this as clearly as possible and I have probably made it seem incredibly challenging but it's actually really REALLY easy!