Showing posts with label byo. Show all posts

Saturday, 11 June 2011

Mostly Minimalist - Free 2 column blog template

This template is simply simple - very minimalist and nothing pretentious.  It includes a wide "main blog" column for your blog posts and a sidebar with light grey banners in the background.


click above for a live demo site

BONUS BLANK HEADERS:

I have also included some blank pre-made banners for this template which look quite nice too.  These are made using dingbat font "Adhesive Nr Seven" and can be found here

Here are the 6 headers I have made:

If you would like to use one of these header images instead of the boring old plain-text header that comes with the template you will have to follow these instructions:
  1. Pick the header image you want to use.  There is a folder within the downloadable zip folder called "HeaderImages" - the blank header images can be found in here.
  2. Edit the image to include your header/description.  You can use various graphics programs like Photoshop, Photoshop Elements etc, or you can use free online applications like Aviary (use Phoenix) or Editor by Pixlr. There may be more out there that I don't know about.

  3. Upload your new header image into your blog:
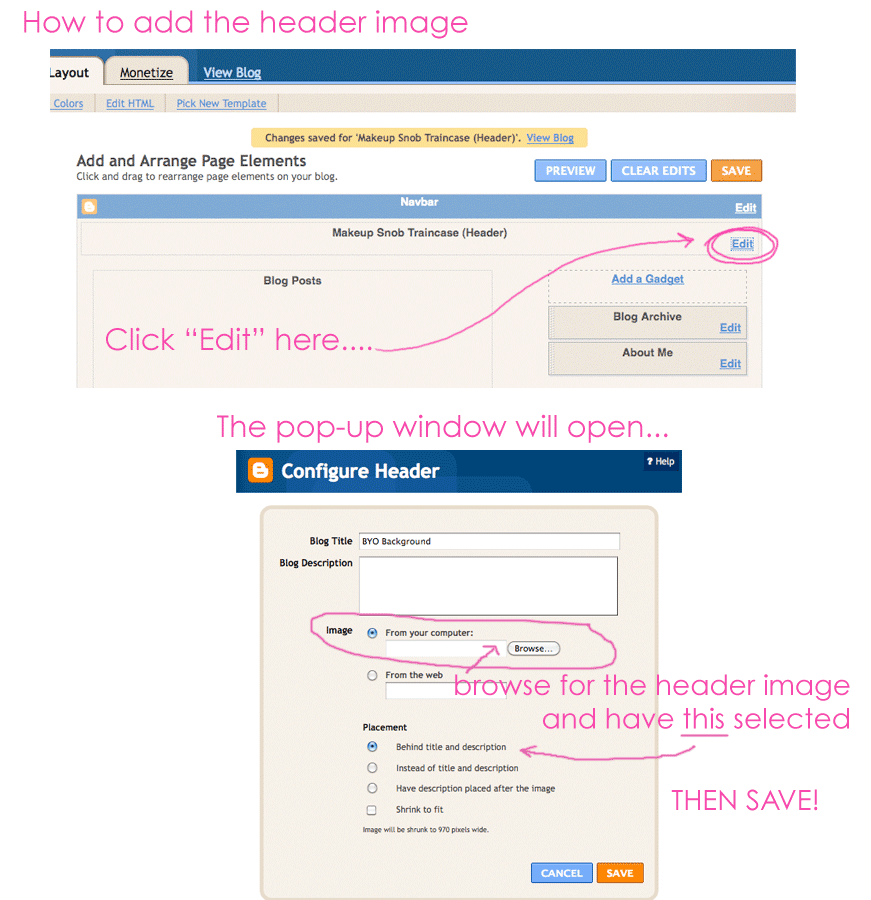
    Go to the LAYOUT then PAGE ELEMENTS window and click on “EDIT” in the header area:


    A pop-up window will appear (see below)


    Browse for the header image file on your computer and make sure you select “Instead of title and description” is selected (also, do not select ‘shrink to fit’).
    Click SAVE.

  4. Done!

Tuesday, 19 April 2011

BYO Background with Changeable Google Fonts


Remember BYO Background

Well, I have re-made it to be friendly to Google Fonts!  So now the blog title, sidebar headers and blog post headings aren't locked into Century Gothic like the original template is!

WOOHOO!
All fonts can be now changed within the Template Designer area (under Design > Template Designer).

If you know what you are doing, download the updated version here.

Using one of Totally Severe's backgrounds this is what I have come up with:

If you have no idea what the deal is - in a nutshell: this template is a blank canvas and with a few edits you can fully customise the colour of the header and the background image and it can be easily transformed.

HOW TO USE THIS:

1) Install the template (as per normal)
2) Find a background image you'd like to use on your blog. Of course it's your responsibility to make sure it can be used for a personal (or commercial) site.

For this example, I want to use this background by Totally Severe.


{STOP THE PRESS: Just look at some of the freaking amazing backgrounds you can find on Totally Severe here, here and here! I AM IN LOVE!}

3) Download the image, save to your computer. You will need your own image hosting. I like Photobucket. It's free. Whilst Totally Severe seems to already host their images on Photobucket, it's good manners to host images for your own site yourself.

4) Put the background image code into your blog.

Go back to blogger and click on the "Design" > "Edit HTML" tabs.

Scroll down the big box of code until you find the /* ---( page defaults )--- *:

*/ /* ---( page defaults )--- */
body {
margin: 0;
padding: 0;
font-size: small;

text-align: center;

color: $textcolor;
background: #CCC url
() repeat fixed;
background-attachment: fixed; }


You will see there are two brackets with nothing in them (in bold red, above)

Paste your direct image link in between the brackets. My code now looks like this:

*/ /* ---( page defaults )--- */
body {
margin: 0;
padding: 0;
font-size: small;

text-align: center;
color: $textcolor;

background: #CCC url
(http://www.image_url_here.jpg) repeat fixed;
background-attachment: fixed; }


Click SAVE.

5) Add your header colour background

In the zip folder you downloaded, you will see a folder called "HeaderImages". Have a look in there and you'll see loads of different coloured header images. They all have curved corners:


(many more colours in the folder)

Pick one you like (or better still, pick on that matches your background image).


DONT SEE ONE YOU LIKE?  Just make it yourself!

Click on the "Design" tab and then "Page Elements".


Follow these instructions (click for a bigger image):


THAT'S IT!


OK SHARNEE SHUT UP AND JUST GIVE ME THE TEMPLATE!

Wednesday, 16 February 2011

How to change predetermined header fonts in the BYO Background template

I am going to show you how to change pre-determined fonts in my templates so that you can use the new Google Web Fonts within your design.

The font I am going to change is the Blog title font and I am going do do this practice run on my BYO Background template first (it's an easy one to alter).


 Before making any changes to your current site, please back up your current template!

You can do this by going to DESIGN then EDIT HTML and then clicking "Download full template".
(keep this .xml file safe for if things go weird then you may want to re-install it)


Now I have to admit something... this BYO Background template already has the work half done for you.  It's very easy to insert the Google font choices, selectable by going to Design > Template Designer.  Some of my other templates are going to require a further step.

  1. Go to the DESIGN > EDIT HTML tabs within Blogger
  2. Scroll down the big box of code until you see the following (HINT: it's not very far down):


    /* Variable definitions
    ====================
    <Variable name="textcolor" description="Text Color"
    type="color" default="#333300" value="#7f7f7f">
    <Variable name="datecolor" description="Date Header Color"
    type="color" default="#333300" value="#bebebe">
    <Variable name="titlecolor" description="Post Title Color"
    type="color" default="#000000" value="#4c4c4c">
    ..... and so on

    This area (under the 'Variable Definitions' heading) is where all the font colours and font choices are kept that are directly editable in the Template Designer area.

    We will come back to this area.

  3. Scroll (or search) for the following code.  This is what controls the header font of the blog and it's about halfway down the page of code:

    #header h1 {
     margin:5px 5px 0;
    padding-left: 50px;
    padding-right: 50px;
    padding-top: 140px;
    text-align: left;
     line-height:1.2em;
     letter-spacing:.05em;
    font: 42px century gothic;
    text-transform: lowercase;
    text-align: center;
    }

    (HINT: if you're not looking at the BYO Background template then this may look different!)

    See that font: 42px century gothic; line?

    THAT is what controls the font of the header.  As you will see, the font and size is specified here.


  4. Let's scroll back up to see the Variable Definitions....

    We are not changing the font colour, we are going to change the font type of the header, so let's scroll down a bit more.....

    But WAIT - what's this?


    There already SEEMS to be a header font (in BYO Background Template case, the variable name is called "pagetitlefont".  You will also see that the font type is Georgia, Utopia, Panatino....

    What now?  This is not the case in my blog!  It's showing up as Century Gothic!

    There's a perfectly reasonable explanation for this: there is code overriding the "Page Variables" so if we change this header font in the Template Designer area we will not be able to see it!
  5. I hope you're following me, I know it's tricky.
  6. What we now have to do is copy the variable name - which in this case is pagetitlefont
  7. Let's scroll back down to the #header h1 { area.....

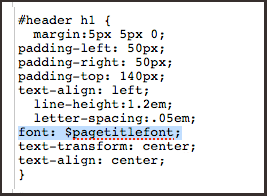
    Delete this line (highlighted in blue, below):


    And type in $pagetitlefont (yes, include the dollar sign!)

    It should now look like this:


    (HINT: If you don't want your text to transform to lowercase, remove the line of text-transform: lowercase;)

  8. CLICK SAVE!
    (if it doesn't save or if you have an error then you have missed some punctuation out which can really throw everything into chaos.  The line should always end with a ";")

  9. Go to DESIGN > PAGE ELEMENTS and then select the 'Advanced' tab.

    Scroll down until you see the "Blog Title Font" name and pick whichever font you like.
    You can change the size, make it bold, italic and it will work!

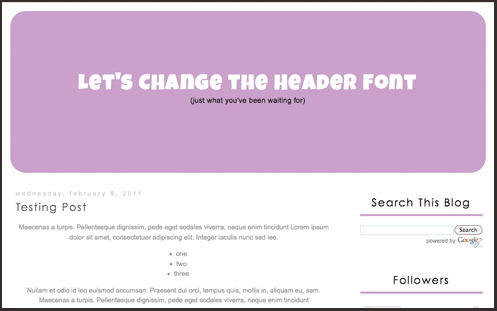
    I picked 'Luckiest Guy' - TA-DA!


IMPORTANT INFORMATION: If you are using another template then this above method is probably not going to work.

Some may look for the Blog Title Font within the page variables and there might not be anything there (probable!).  If you are using another template of mine - "She May Adore Me" for example - then there is not going to be any code in STEP 4 (above) to easily do this. You will have to add this Variable information in there, give it an individual name and then alter the code further down the blog.

This is the tricky way, which is why I thought I would start off with an easy tutorial for BYO Background.


Just a final note to say......  this is probably going to raise more questions than I hope it answers and I am sorry about that, I do wish I could let you know easily how to do this.  The problem is that every template is going to be quite different and there could be a thousand different ways to do this for a thousand different people.  So I hope you do understand that this is not a one-solution-fits-all.

I am going to be offering small Blog makeovers on Suck My Lolly very soon, so maybe I will include this functionality in my price.

I love questions but if you have one about a specific template then please be aware I'm just not going to have the time to answer. Hopefully this does help you understand how it works.... even a little bit.

Wednesday, 24 November 2010

3 Column BYO background

Yes, some people asked for it, so here is BYO Background in a 3 column version! Hip hip hooray.

If you're new to this template please read this post about the 2 column version.

In a nutshell: this template is a blank canvas and with a few edits you can fully customise the colour of the header and the background image and it can be easily transformed into something like this......


click above for a live preview


FYI I have used a background from Ollibird and the header image is the 'LightSalmon' header.
The template does not come like this, you have to bring your own background, hence the BYO title.


Coming soon.... a tutorial on how to change the text of the blog header with the Google Font Directory (good idea!)

Saturday, 6 November 2010

BYO Background (use a background image of your choice!)

This is something pretty special!

I have created a pretty generic simple naked template that is waiting for a background image you have or may want to use.

It's pretty simple to do, but in a nutshell: this template is a blank canvas and with a few edits you can fully customise the colour of the header and the background image and it can be easily transformed.

1) Install the template (as per normal):


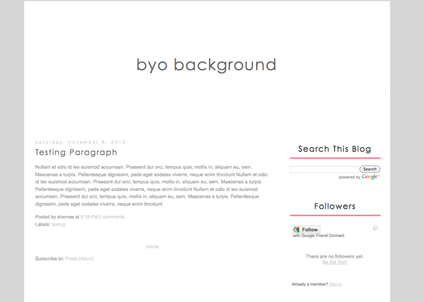
YES! IT IS COMPLETELY BORING!
(settle down, we'll now jazz it up)

2) Find a background image you'd like to use on your blog. Of course it's your responsibility to make sure it can be used for a personal (or commercial) site.

For this example, I want to use this background by Totally Severe.


{STOP THE PRESS: Just look at some of the freaking amazing backgrounds you can find on Totally Severe here, here and here! I AM IN LOVE!}


3) Download the image, save to your computer. You will need your own image hosting. I like Photobucket. It's free. Whilst Totally Severe seems to already host their images on Photobucket, it's good manners to host images for your own site yourself.

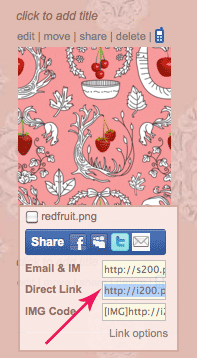
Log into Photobucket (or similar), upload your image and then grab the direct URL address of the image:


4) Put the background image code into your blog.

Go back to blogger and click on the "Design" > "Edit HTML" tabs.

Scroll down the big box of code until you find the /* ---( page defaults )--- *:

*/ /* ---( page defaults )--- */
body {
margin: 0;
padding: 0;
font-size: small;

text-align: center;

color: $textcolor;
background: #CCC url
() repeat fixed;
background-attachment: fixed; }


You will see there are two brackets with nothing in them (in bold red, above)

Paste your direct image link in between the brackets. My code now looks like this:

*/ /* ---( page defaults )--- */
body {
margin: 0;
padding: 0;
font-size: small;

text-align: center;
color: $textcolor;

background: #CCC url
(http://i200.photobucket.com/albums/aa231/free_blogger/redfruit.png) repeat fixed;
background-attachment: fixed; }


Click SAVE.

5) Add your header colour background

In the zip folder you downloaded, you will see a folder called "HeaderImages". Have a look in there and you'll see loads of different coloured header images. They all have curved corners:


(many more colours in the folder)

Pick one you like (or better still, pick on that matches your background image).

Click on the "Design" tab and then "Page Elements".


Follow these instructions (click for a bigger image):


THAT'S IT!

I added the red header image background and this is now how my test blog looks:


(click for a live preview)

Note: you can easily change the header text colour and sidebar bottom border colour by going to LAYOUT > TEMPLATE DESIGNER > ADVANCED. You will be able to change the colours to match your background there.


ALTERNATE HEADER IDEA: Why not take the header image and add your own text in a graphics program to reflect your own header title? It would look fancier this way! ..... then when uploading it select "Instead of title and description". Let me know if you want more info on that but it's pretty simple.


"OK Sharnee, that's amazing now please tell me where to get some awesome backgrounds from!!!!!!!"


SHOW ME WHAT YOU DO! I WANT TO SEE!

Any questions or confusion, let me know!

PS: It's also a good idea to give the artist of your background a link, in the sidebar or footer. Don't forget ;)

PPS: Yeah I know I can't spell cappucino
!