Remember BYO Background?
Well, I have re-made it to be friendly to Google Fonts! So now the blog title, sidebar headers and blog post headings aren't locked into Century Gothic like the original template is!
WOOHOO!
All fonts can be now changed within the Template Designer area (under Design > Template Designer).
If you know what you are doing, download the updated version here.
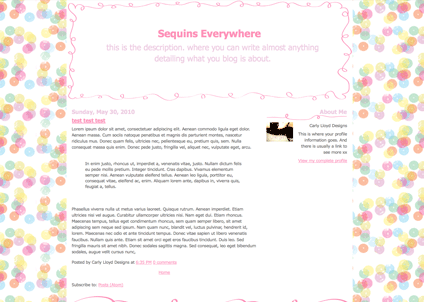
Using one of Totally Severe's backgrounds this is what I have come up with:


If you have no idea what the deal is - in a nutshell: this template is a blank canvas and with a few edits you can fully customise the colour of the header and the background image and it can be easily transformed.
HOW TO USE THIS:
1) Install the template (as per normal)
2) Find a background image you'd like to use on your blog. Of course it's your responsibility to make sure it can be used for a personal (or commercial) site.
For this example, I want to use this background by Totally Severe.
{STOP THE PRESS: Just look at some of the freaking amazing backgrounds you can find on Totally Severe here, here and here! I AM IN LOVE!}
3) Download the image, save to your computer. You will need your own image hosting. I like Photobucket. It's free. Whilst Totally Severe seems to already host their images on Photobucket, it's good manners to host images for your own site yourself.
Go back to blogger and click on the "Design" > "Edit HTML" tabs.
Scroll down the big box of code until you find the /* ---( page defaults )--- *:
*/ /* ---( page defaults )--- */
body { margin: 0;
padding: 0;
font-size: small;
text-align: center;
color: $textcolor;
background: #CCC url() repeat fixed;
background-attachment: fixed; }
You will see there are two brackets with nothing in them (in bold red, above)
Paste your direct image link in between the brackets. My code now looks like this:
*/ /* ---( page defaults )--- */
body {
margin: 0;
padding: 0;
font-size: small;
text-align: center;
color: $textcolor;
background: #CCC url(http://www.image_url_here.jpg) repeat fixed;
background-attachment: fixed; }
Click SAVE.
5) Add your header colour background
In the zip folder you downloaded, you will see a folder called "HeaderImages". Have a look in there and you'll see loads of different coloured header images. They all have curved corners:

(many more colours in the folder)
Pick one you like (or better still, pick on that matches your background image).
DONT SEE ONE YOU LIKE? Just make it yourself!
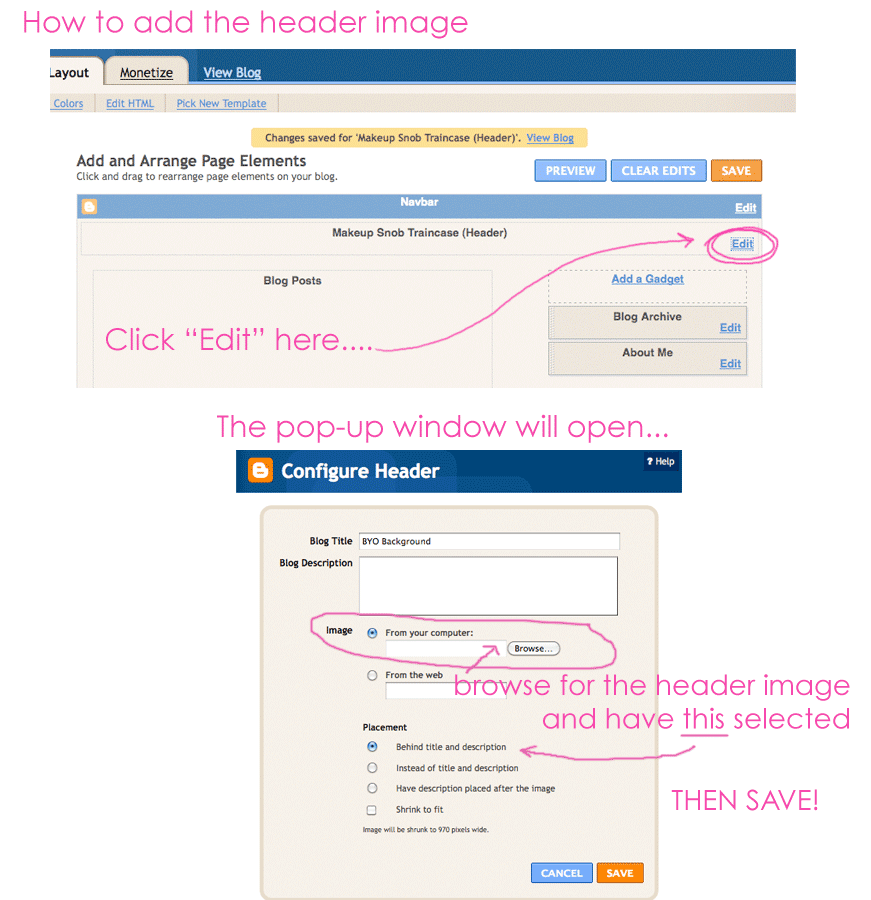
Click on the "Design" tab and then "Page Elements".
Follow these instructions (click for a bigger image):
THAT'S IT!
OK SHARNEE SHUT UP AND JUST GIVE ME THE TEMPLATE!

- To download the xml template: click here (zip folder)
- Preview the site here
- Need help installing this? Click here