
The font I am going to change is the Blog title font and I am going do do this practice run on my BYO Background template first (it's an easy one to alter).

Before making any changes to your current site, please back up your current template!
You can do this by going to DESIGN then EDIT HTML and then clicking "Download full template".
(keep this .xml file safe for if things go weird then you may want to re-install it)
You can do this by going to DESIGN then EDIT HTML and then clicking "Download full template".
(keep this .xml file safe for if things go weird then you may want to re-install it)
Now I have to admit something... this BYO Background template already has the work half done for you. It's very easy to insert the Google font choices, selectable by going to Design > Template Designer. Some of my other templates are going to require a further step.
- Go to the DESIGN > EDIT HTML tabs within Blogger
- Scroll down the big box of code until you see the following (HINT: it's not very far down):
/* Variable definitions
====================
<Variable name="textcolor" description="Text Color"
type="color" default="#333300" value="#7f7f7f">
<Variable name="datecolor" description="Date Header Color"
type="color" default="#333300" value="#bebebe">
<Variable name="titlecolor" description="Post Title Color"
type="color" default="#000000" value="#4c4c4c">
..... and so on
This area (under the 'Variable Definitions' heading) is where all the font colours and font choices are kept that are directly editable in the Template Designer area.
We will come back to this area.
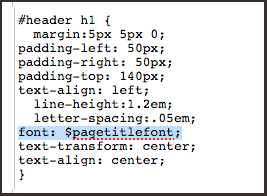
- Scroll (or search) for the following code. This is what controls the header font of the blog and it's about halfway down the page of code:
#header h1 {margin:5px 5px 0;padding-left: 50px;padding-right: 50px;padding-top: 140px;text-align: left;line-height:1.2em;letter-spacing:.05em;font: 42px century gothic;text-transform: lowercase;text-align: center;}
(HINT: if you're not looking at the BYO Background template then this may look different!)
See that font: 42px century gothic; line?
THAT is what controls the font of the header. As you will see, the font and size is specified here.
- Let's scroll back up to see the Variable Definitions....
We are not changing the font colour, we are going to change the font type of the header, so let's scroll down a bit more.....
But WAIT - what's this?

There already SEEMS to be a header font (in BYO Background Template case, the variable name is called "pagetitlefont". You will also see that the font type is Georgia, Utopia, Panatino....
What now? This is not the case in my blog! It's showing up as Century Gothic!
There's a perfectly reasonable explanation for this: there is code overriding the "Page Variables" so if we change this header font in the Template Designer area we will not be able to see it!
- I hope you're following me, I know it's tricky.
- What we now have to do is copy the variable name - which in this case is pagetitlefont
- Let's scroll back down to the #header h1 { area.....
Delete this line (highlighted in blue, below):

And type in $pagetitlefont (yes, include the dollar sign!)
It should now look like this:
(HINT: If you don't want your text to transform to lowercase, remove the line of text-transform: lowercase;)
- CLICK SAVE!
(if it doesn't save or if you have an error then you have missed some punctuation out which can really throw everything into chaos. The line should always end with a ";")
- Go to DESIGN > PAGE ELEMENTS and then select the 'Advanced' tab.
Scroll down until you see the "Blog Title Font" name and pick whichever font you like.
You can change the size, make it bold, italic and it will work!
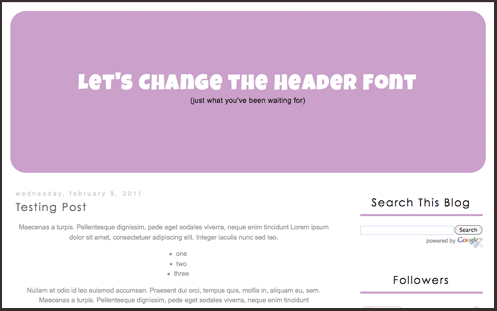
I picked 'Luckiest Guy' - TA-DA!


IMPORTANT INFORMATION: If you are using another template then this above method is probably not going to work.
Some may look for the Blog Title Font within the page variables and there might not be anything there (probable!). If you are using another template of mine - "She May Adore Me" for example - then there is not going to be any code in STEP 4 (above) to easily do this. You will have to add this Variable information in there, give it an individual name and then alter the code further down the blog.
This is the tricky way, which is why I thought I would start off with an easy tutorial for BYO Background.
Just a final note to say...... this is probably going to raise more questions than I hope it answers and I am sorry about that, I do wish I could let you know easily how to do this. The problem is that every template is going to be quite different and there could be a thousand different ways to do this for a thousand different people. So I hope you do understand that this is not a one-solution-fits-all.
I am going to be offering small Blog makeovers on Suck My Lolly very soon, so maybe I will include this functionality in my price.
I love questions but if you have one about a specific template then please be aware I'm just not going to have the time to answer. Hopefully this does help you understand how it works.... even a little bit.

I was able to use this and change my header and a few others to the Google Tangerine Font, I love that it's unique.
ReplyDeleteThanks for sharing.
Hi Myne! So glad to hear it worked for you! Yay!
ReplyDeleteThis is really special tips for me. I just looking for it. I want to solution of this problem since long time.
ReplyDeleteFew days ago i visit this blog and saw this tips. Then i do this trick but it did not work. But yesterday was good day and your trick was successfully done. Thanks for it.
ReplyDeleteAw man either I'm blind or there actually isn't an 'Advanced' tab on my screen :(
ReplyDeleteIt totally worked for me! I'm using your Bunting theme and I tweaked it a bit (I hope it's okay with you). Thanks for all the tutorials! Blogging has become a piece of heaven because of you! :)
ReplyDeleteHi Sharnee
ReplyDeleteThank you for define step by step process of predefine header font ,after reading this i am more confident that i will be change and customized my blog like programmer :)
Lyssa Gale
All Fonts